Temperature Measurement and Burn Mechanism of Stainless Steel 1Cr11Ni2W2MoV in Grinding
December 29,2022
Abstract. An experimental study was carried out to investigate the temperature measurement method and burn mechanism in the surface grinding of a stainless steel 1Cr11Ni2W2MoV with SG abrasive wheels. The temperature response at the wheel-workpiece interface was measured using a pair of thermocouple composed of the workpiece material and a single enameled constantan wire which was implanted in the workpiece. Changes in the ground surface morphology and metallography of the specimens in different grinding conditions were analyzed. Plastically deformed coating layers and micro-cracks were observed on ground surface by SEM (Scanning Electronic Microscopy) when grinding burn occurs. Grinding burn mechanism was unveiled from a metallographic point of view. When the average temperature exceeded phase alteration temperature of 1Cr11Ni2W2MoV, the original gray strip martensite structure was replaced by tempered sorbite structure, which caused a sharp reduction of the workpiece surface hardness. The results provided a theoretical and experimental basis for technical optimization in the grinding of high temperature stainless steel with high efficiency and high quality.
Introduction
1Cr11Ni2W2MoV is a kind of heat resistant stainless steel, which is widely used as the material of aeroturbine blades owing to its generally outstanding mechanical property such as excellent toughness, oxidation resistance and corrosion resistance. Since strict requirements of geometric accuracy and surface quality have to be fulfilled, grinding process is always applied as the final finishing of the blades [1].Unfortunately, mechanical properties of high temperature stainless steel 1Cr11Ni2W2MoV make it difficult to grind and may lead to elevated temperatures at the grinding zone and possible grinding burn on surface of the workpiece during grinding with abrasive wheels, which deteriorate the surface quality of the workpiece seriously. Extensive research has been carried out on the surface integrity when grinding high temperature alloy and titanium alloys [2-5], and few studies on grinding burn mechanism of stainless steel was reported. Demands on reducing the grinding costs and increasing grinding efficiency have been posing continuous challenges for the high temperature stainless steel’ grinding technologies. The sol-gel alumina abrasive wheel is a new type of grinding wheel developed in recent years. There have been no profound studies reported on the grinding characteristic of high temperature stainless steel with SG wheels.
In this paper, grinding temperature and burn mechanism when grinding 1Cr11Ni2W2MoV stainless steel using SG wheels were investigated. Different specimens were obtained through changing the grinding conditions. The grinding temperature was measured and the surface morphology was analyzed. Grinding burn mechanism of high temperature 1Cr11Ni2W2MoV stainless steel was unveiled from a metallographic point of view of burned surface layer, which provided a theoretical and experimental basis to avoid grinding burn in the grinding application process.
Experimental Conditions
Surface grinding experiments were carried out on a surface grinder. The wheel was trued and dressed using a single-point diamond dresser. Workpiece Material. The workpiece material 1Cr11Ni2W2MoV was prepared according to conditions of aeroengine blades. Its chemical composition and mchanical properties are found in Table 1 and Table 2.
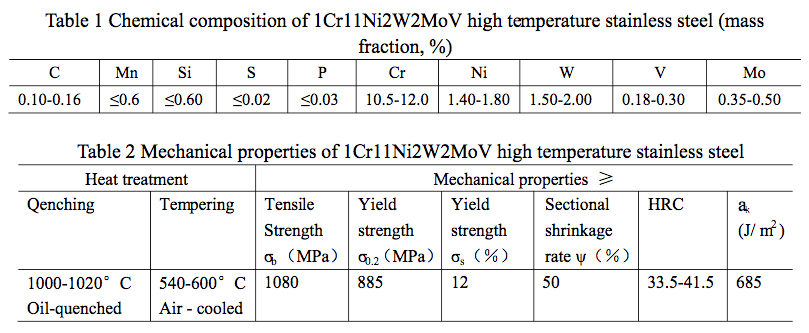
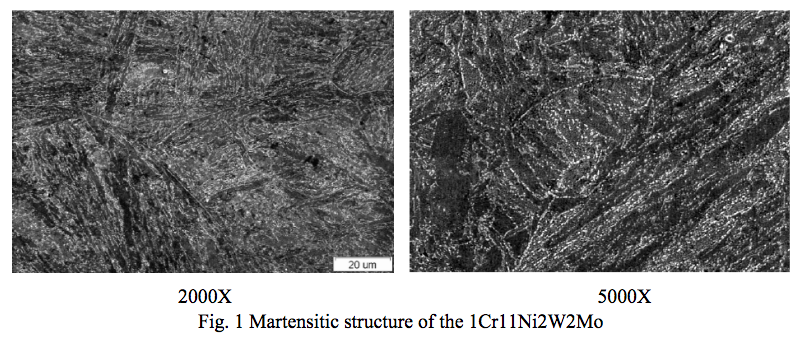
Figure 1 shows SEM pictures of the tested 1Cr11Ni2W2MoV material, from which we can see that the original structure of 1Cr11Ni2W2MoV is martensitic, and its morphology characteristics is similar slats and polygonal arrangement, namely the lath martensitic structure. This structure has higher strength and toughness.
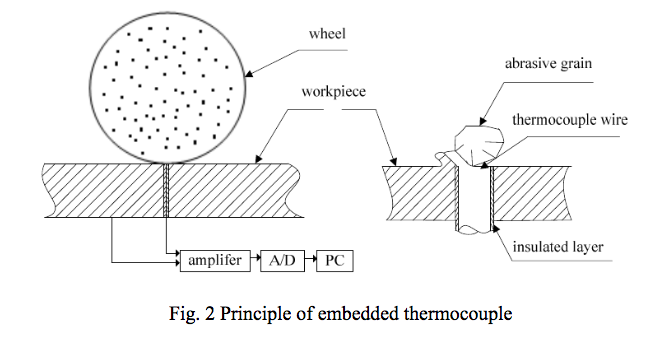
Temperature Measurement Method. Inserted thermocouple was used to measure the grinding temperature as shown in Fig. 2. An enameled constantan wire of diameter 0.07mm was implanted between two pieces of splitting workpiece. The thermocouple was made up of 1Cr11Ni2W2MoV and constantan wire and a hot junction was formed when the cutting action of SG grains damaged the insulator layer around constantan wire. The thermoelectric EMF (electromotive force) signals were collected by a single channel A/D converter after being amplified through amplifier. The detected thermal emf was transferred into temperature readings based on the calibration data. The surface topography and metallurgical change of subsurface were observed with an SEM.
Experimental Results
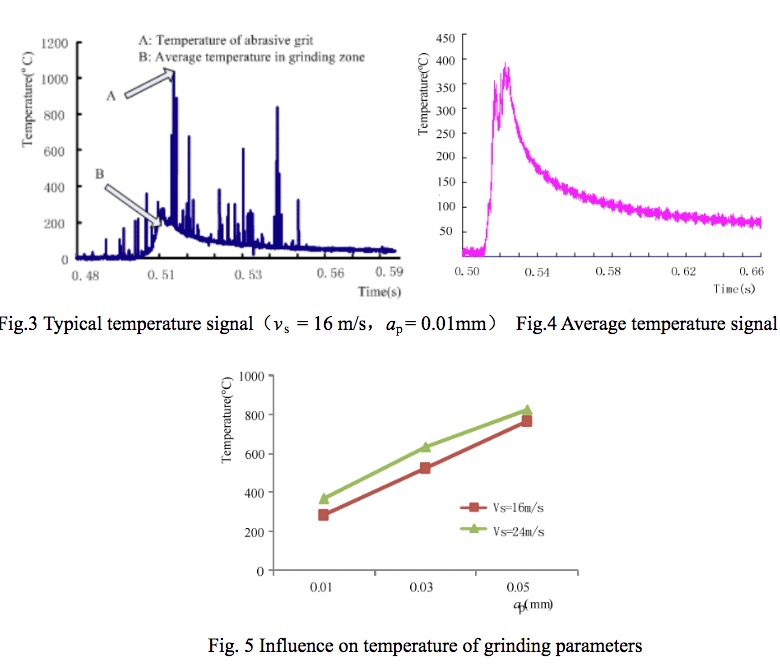
Grinding Temperature. The signal collection frequency in the experiment is 200 kHz. An example of temperature response recorded by the constantan-1Cr11Ni2W2MoV thermocouple during a single grinding pass is shown in Fig. 3. It could be seen that the grinding temperature distribution in the grinding contact zone presented the signal pattern featuring stochastic distribution of “peak flash temperature A” on the base of “background temperature B”. The “background temperature” indicated the average temperature change on the contact zone, and the “peak flash temperature” was considered to be associated with the cutting action at individual abrasive cutting point. The temperature of abrasive grits could be used to evaluate the number of active cutting points, contact length and dynamic cutting-point density that would be useful for optimization of grinding wheel topography. When the signal collection frequency in the experiment decreases to 10 kHz, only the average temperature was obtained as showed in Fig. 4, and the average temperature on the contact zone was considered the direct reason for grinding burn [7]. It was observed that the temperature at abrasive cutting point changed little when grinding parameters was varied by reduplicate experiments. It was about 1020°C in dry grinding 1Cr11Ni2W2MoV with SG wheels. The average temperature in the grinding contact zone varied obviously when grinding condition was changed. The influence of both grinding depth and velocity of wheel on the average temperature was summarized in Fig. 5, in which the temperature was plotted against the depth of grind, for two different wheel velocities at the same feed speed. It could be seen that the grinding temperature increased as the depth of grinding was raised at any wheel speed. And higher temperature could also be observed at higher wheel speed. When vs =24m/s, the measured average temperature is 368ºC, 636 ºC, 827 ºC when ap is 0.01mm,0.03mm,0.05mm respectively. Three specimens of three different temperature mentioned above were obtained for further observation. Burning color was found on specimens when temperature is 636 ºC and 827 ºC.
Surface Topography. The topography can be used to qualitatively describe surface texture. Scanning electron microscope is the common and useful way for topography studies. Three specimens were observed by SEM method as showed in Fig. 6(a). Fig. 6(b) and Fig. 6(c) when the average temperature is 368ºC, 636ºC, 827ºC respectively.

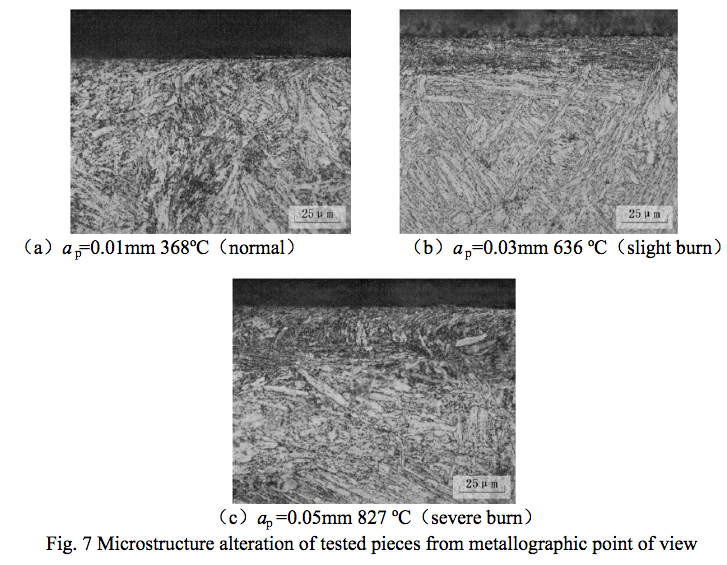
From Fig. 6(a), it can be seen that the ground surface was relatively smooth and consisted mostly of overlapping scratches produced by the interactions of abrasive cutting points with the workpiece when the average temperature is 368ºC. When ap increased to 0.03 mm, the surface veining turned rough as showed in Fig. 6(b). This indicated that the plastic side flow plowing of the 1Cr11Ni2W2MoV stainless steel around abrasive grains increased with the chip adhesion and the steel was extruded to the side of abrasive grains. When ap increased to 0.05mmm, some kind of plastically deformed coatings appeared and gradually spread on the ground workpiece surfaces with increasing of temperature. The plastic flow of the steel under the abrasive grains led to much scale-shaped debris on the surface and micro-cracks were found on the workpiece surface obviously, as showed in Fig.6(c), which could deteriorate the erosion resistance and reduce the fatigue life of the workpiece. Metallurgical Analysis of Grinding Burn Layer. Three specimens mentioned were analyzed from a metallographic point of view to unveil the grinding burn mechanism of 1Cr11Ni2W2MoV stainless steel. The surface perpendicular to the grinding velocity was sectioned, polished and eroded for metallographic analysis. The metallographs of the surface layer were shown in Fig.7. From Fig7(a), no obvious changes can be found compared with original phases in the 1Cr11Ni2W2MoV because the average temperature is low. It could be seen that the color of the subsurface was obviously darker than the inner materials uninfluenced by grinding as showed in Fig7(b) and Fig7(c). This indicated that 1Cr11Ni2W2MoV exhibited metallurgical changes from the surface into the workpiece when grinding burn occurs. Mass heat accumulated within a short time made tempered reaction occur on martensite structures of surface at elevated temperature. When the average temperature exceeded phase alteration temperature of 1Cr11Ni2W2MoV, the original gray strip structure was replaced by a grainy black structure. From the chart we can see clearly white fine granular cementite intersperses in the ferrite matrix, from which it can be determined that the black metamorphic layer was tempered sorbite structure. Phase alteration caused by grinding burn made the surface hardness decrease sharply, which affected the coincidence of performance of 1Cr11Ni2W2MoV severely. From Fig. 7(b) and Fig. 7(c), it can be seen that the thickness of the black metamorphic layer increases as the grinding burn becomes severe. When T=636 ºC, the thickness of the black metamorphic layer is about 25um in Fig. 7(b), and arrives to about 35um when severe grinding burn occurs in Fig. 7(c).
Conclusions In
this paper, 1Cr11Ni2W2MoV stainless steel was machined using SG abrasive wheel to investigate the grinding temperature and surface burn mechanism. Changes in the ground surface morphology and metallography of the specimens in different grinding conditions were analyzed. When ap was lower than 0.03mm, morphology of the surface was clear and smooth, and severe plastically deformed coating layers and a large number of micro-cracks were observed on the ground surface by SEM when temperature was higher than 636 ºC. Grinding burn mechanism was unveiled from a metallographic point of view. When the average temperature exceeded phase alteration temperature of 1Cr11Ni2W2MoV stainless steel, the original gray strip martensite structure was replaced by tempered sorbite structure, which affected the mechanical performance of 1Cr11Ni2W2MoV severely.